This is an old revision of the document!
Interface guide: The Play Page
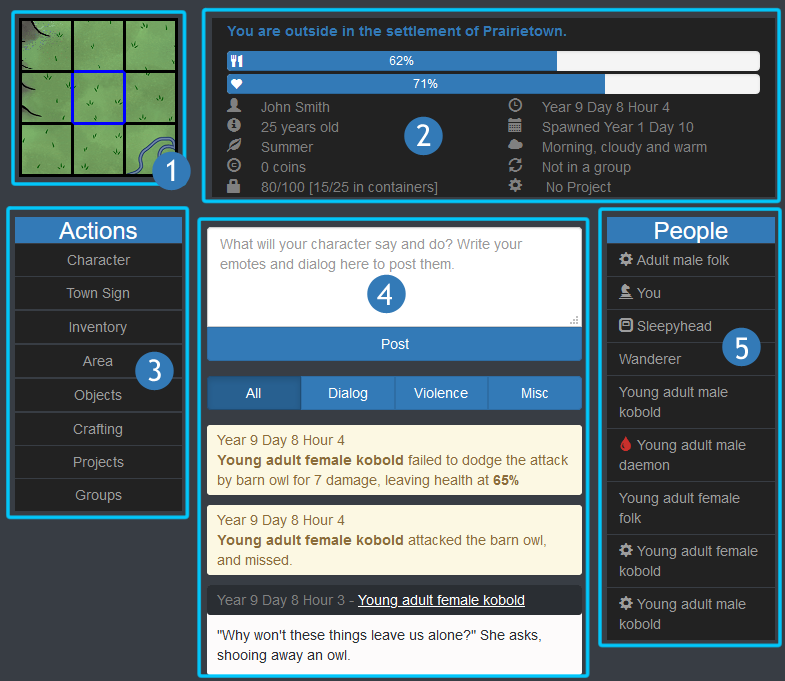
When you enter the game by clicking the "Play" button on one of your character cards, you will be brought to the play page, which is where the vast majority of gameplay happens - nearly everything you do in game will be done from this page. The play page is separated into the following five sections:
Contents
The Map
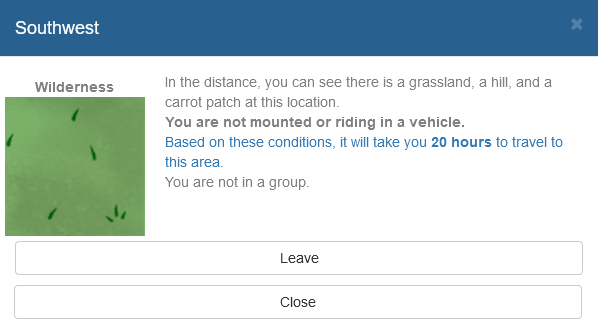
The in-game map shows you a graphical representation of the area you are currently in, as well as the eight map tiles surrounding it.
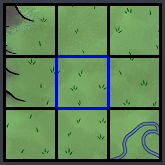
If you click on any of the surrounding tiles, a dialogue will be opened where you can see what biomes exist in that area, and it will allow you to travel there by clicking the 'Leave' button at the bottom and then confirming. Note that the map is unavailable while travelling, or while inside a building other than a watchtower.
Character Information
This section shows a summary of information about your own character as well as their surroundings, separated into the following categories:
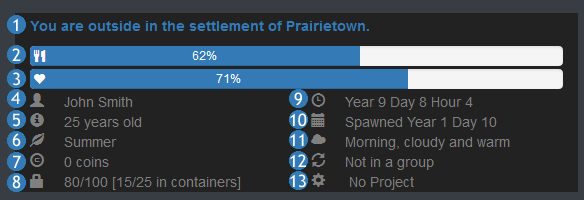
- 1) The name of your current location. This can be either the name of the settlement you are in, "Wilderness" if you are not in a settlement, or the name of the building or vehicle you are currently in.
- 2) Your current hunger level. This bar decreases by 12% every 24 hours, and if it reaches 0% you will become incapable from starvation and begin dying. Eating food can bring your hunger bar above 100%, but you can only eat if it is currently below 100%.
- 3) Your current health. This bar increases by 1% every hour until it reaches 100%. If you take damage from any source, such as a wild animal or another character, it will be reflected here. If it reaches 0%, you will become incapable, or subdued if the source of the damage was another character attacking you. There are also ways to speed up the rate with which your health recovers, such as staying in a furnished room or by using medicine.
- 4) Your character's name as it appears on your character card. This can be changed under "Character" on the Actions menu.
- 5) Your character's current age.
- 6) The current season. Each season lasts one in-game year, and cycles through spring-summer-autumn-winter like in real life.
- 7) The number of coins your character currently possesses. These are created at mints, and can be used as currency at markets in cities.
- 8) The total weight of all items in your character's inventory. The numbers in brackets show the total weight of all containers in your inventory; Each container can hold 5 times its own weight, but a single character is limited to only carrying containers totalling 25 in weight at once.
- 9) The current time in-game.
- 10) This shows when your character was created.
- 11) The current time of day, as well as the weather. These have no mechanical effect, but can be useful for adding flavour when RPing.
- 12) This tells you whether you are currently in a group, and if you are, whether you are leading it or not.
- 13) The project your character is currently working on and contributing effort to.
Actions Menu
This is a list of various actions you can perform in game, separated into the following categories, each described in its own subsection below:
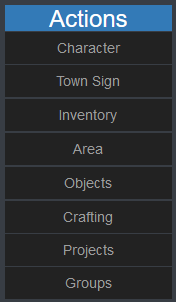
Character
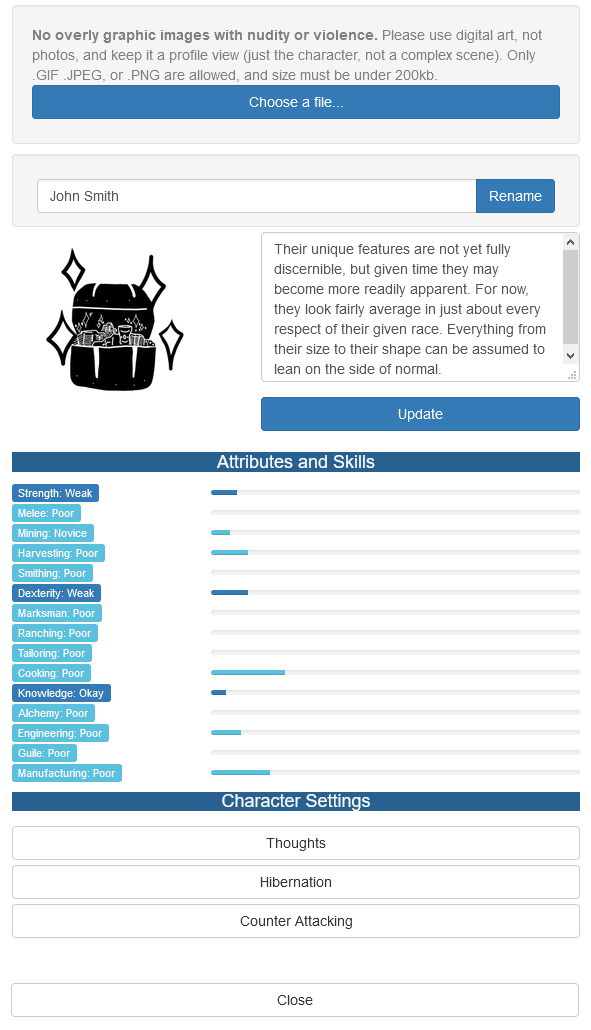
The Character window is where you can set your own character's name, description, and portrait. It also shows an overview of your character's skills and attributes, and how close you are to increasing their level in each of them. Additionally, you can add character thoughts, have your character enter hibernation, or set whether or not your character will counter attack here.
Town Sign
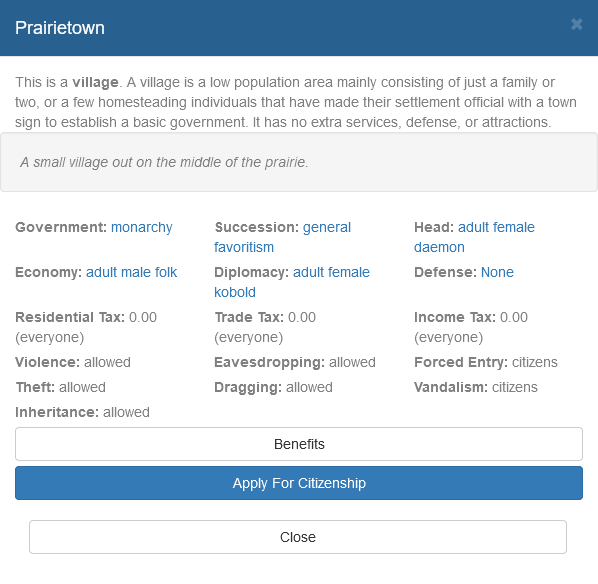
This window, only accessible when you are outside in a settlement, gives you access to information regarding the settlement including who its leaders are, its government type, its laws, and what benefits it confers and to whom. This is also where you can apply to become a citizen, or if you already are a citizen, can see a list of everyone else who is a citizen of this settlement. If you are in a leadership position of the settlement, you will see a list of government options here as well, which can allow you to change laws, update the settlement's description, choose who may benefit from the town's facilities, and fill vacant leadership positions.
The laws listed on the Town Sign are the ones that will be enforced automatically by guards (if any are assigned). If a law is broken, guards will automatically attack the law-breaker once per hour until they are called off, their players log in, or the law-breaker leaves the area - either by travelling away or by entering a building. Below is an explanation for each law:
- Violence: Whether attacking other characters is allowed or not. Note that even if this is forbidden, guards will not enforce this law if your attack is unarmed or your weapon has a quality grade lower than 2.
- Eavesdropping: If this is disallowed, guards will attack you if you fail to eavesdrop on someone else's whispered conversation. Successful eavesdropping will not cause enforcement.
- Forced entry: This law concerns the breaking of locks on buildings and vehicles by use of a crowbar, picking locks using lockpicks, or demolishing a building using a battering ram. The law can be adjusted so that some, but not all, of these actions are allowed or disallowed.
- Theft: If this is disallowed, guards will enforce the law if you take items from an incapable person, fail to steal from another character's inventory when pickpocketing, or when taking items out of public containers. This law can also be adjusted so specific actions are allowed or disallowed.
- Dragging: Whether dragging another character into or out of buildings or vehicles is allowed. Note that guardians are always allowed to drag their children, regardless of how this law is set up.
- Vandalism: If this is disallowed, guards will attack anyone who attempts to dismantle or destroy an object on the ground, but not objects in their own inventories.
Note: The town sign should not be confused with a town's bulletin board(s). A bulletin board is a public container where characters can store notes for anyone to read. This is explained in more detail in the Objects section.
Inventory
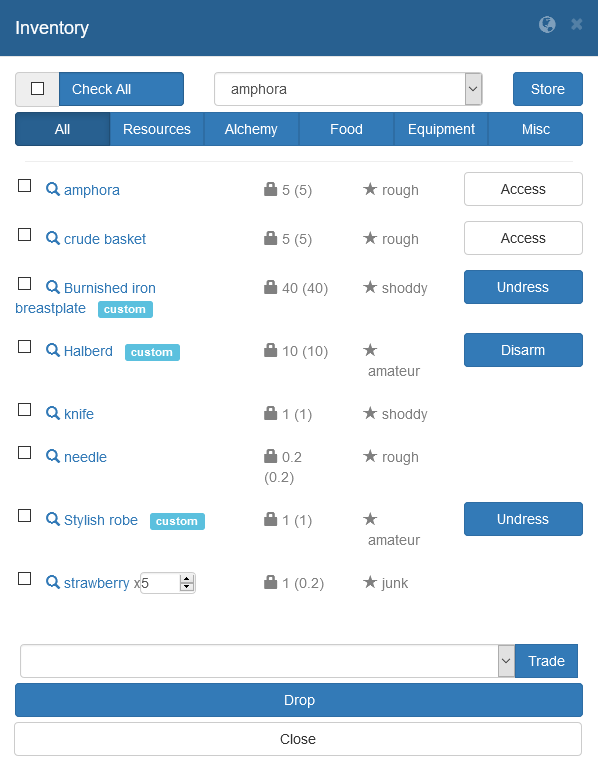
This window shows all the items and containers your character is currently carrying. Items are listed alphabetically, though containers are always listed before any other items. From here, you can wear clothes and armour, equip weapons, and use certain types of item such as food. Using the dropdown menu at the top, items can be placed into containers that are either in your inventory or on the ground in the area. The bottom dropdown menu can be used to give items to other characters if any are present. Additionally, the "Drop" button at the bottom will allow you to drop items onto the floor so that others can pick them up at their leisure. To perform these actions, you must first select which items you want to move, trade, or drop using the checkboxes next to their names. Additionally, for items that can be stacked, you must define the number of items to perform the action on, otherwise the action will be performed on all of them.
Each item has a weight and a quality grade, represented with the and icons respectively. For the weight, the first number is the total weight of the item stack, while the number in parentheses is the weight of each individual item in the stack. The quality grade is somewhat more complex, and its effect depends on what type of item it is:
- Resource: Quality contributes to the quality of a crafted product, along with skill.
- Alchemy: Quality determines how effective medicine is, and how much damage poison deals. In order to cure poison, an antidote of the same quality grade as the poison must be applied.
- Food: Quality of ingredients and preparation determines how filling the food is.
- Weapons: Quality is part of the damage calculation in combat and hunting.
- Armor: Quality is part of the damage reduction calculation in combat and hunting.
- Furniture: Quality raises effectiveness of healing over time in a room/residence/castle with five different pieces of furniture or more.
- Tools/Machines: Quality of the tool/machine being used combined with your level in the relevant skill determines how much progress you make on a project each hour.
Most resource qualities are predefined, such as for ores, metals, gems, woods, and stones; but some are determined by the average skill of all the participants on a project to produce the item, such as with harvesting ingredients or collecting animal produce from tamed animals. Qualities are actual numbers that are used in calculations. Below you will find a table with quality display text and associated number ranges.
| Quality Text | Quality Range |
|---|---|
| Junk | Quality greater than 0 but less than or equal to 1. |
| Amateur | Quality greater than 1 but less than or equal to 1.5. |
| Rough | Quality greater than 1.5 but less than 2. |
| Shoddy | Quality greater or equal to 2 but less than 2.5. |
| Okay | Quality greater than or equal to 2.5 but less than 3. |
| Good | Quality greater or equal to 3 but less than 3.5. |
| Refined | Quality greater than or equal to 3.5 but less than 4. |
| High | Quality greater or equal to 4 but less than 4.5. |
| Expert | Quality greater than or equal to 4.5 but less than 5. |
| Master | Quality is exactly 5. |
Area
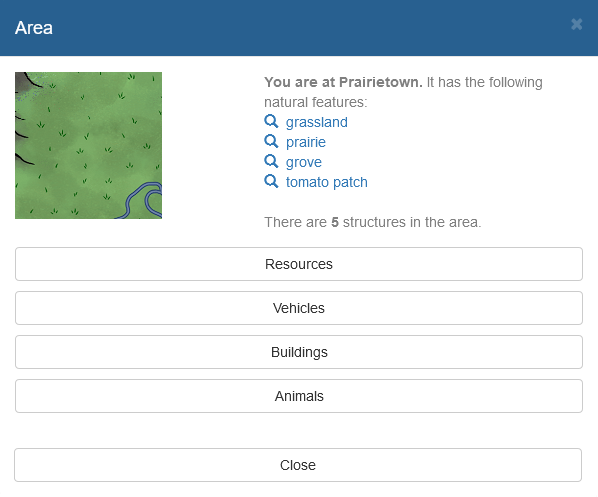
This window, only accessible while outside, shows you the name of the settlement (or "Wilderness" if you are not in a settlement), which biomes can be found in the area, and how many structures (buildings and monuments) there are. This is where you can collect resources, enter vehicles and buildings, and see and interact with the list of animals that are in the area. Which actions are available for a given animal depends on whether the animal is tamed or not, and if so whether it is yours or someone else's. For instance, you can only butcher or collect from your own animals. Note that in order to tame a wild animal, you must have 10 ingredients of the same kind and quality in your inventory which will be used in the taming attempt. Keep in mind that not all animals are tamable.

Objects
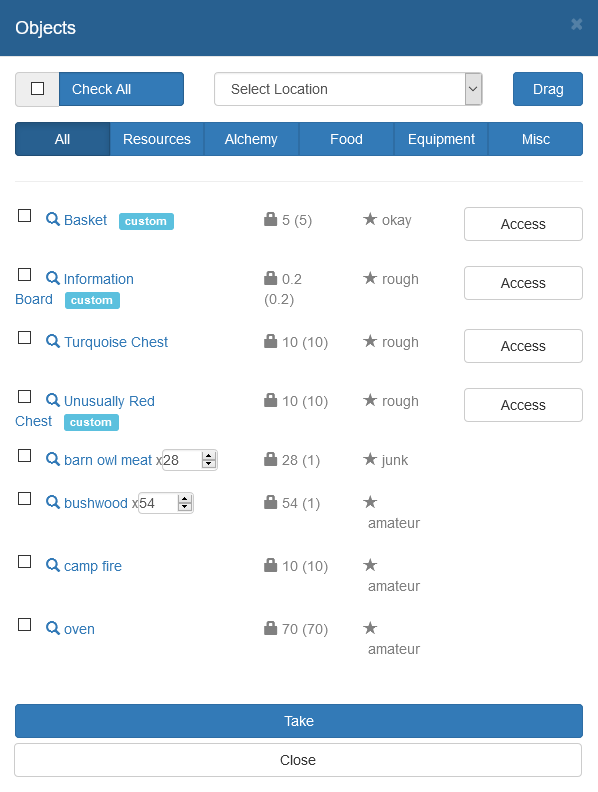
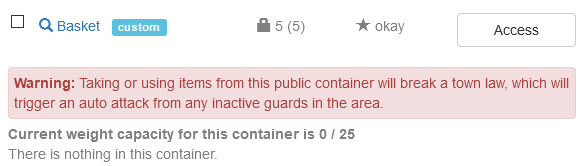
This window acts much like the Inventory window, but showing which items and containers are on the ground in the area. The dropdown menu at the top can be used to drag items into buildings or vehicles, and the button at the bottom allows you to pick up items. Like in the inventory, containers will be listed at the top, and you can access their contents with the Access button so long as they are not locked. Be aware that taking items out of public containers may be against the law in the settlement you are in! If it is, a warning will be displayed when you access the container:
As a newly spawned character, you may be asked to read the contents of the bulletin board. A bulletin board is not to be confused with the Town Sign - it is a container and as such available from the Objects list. This is where you will likely find rules for how to behave within the town. There may also be tips on how to best make yourself useful, maps of the area, and other useful information. Though it may be against the town's laws to take notes from the board, you can read the notes without taking them by clicking each note's name. Bulletin boards, like any other container, can have custom names. As an example, in the screenshot above the bulletin board is named "Information Board".
Crafting
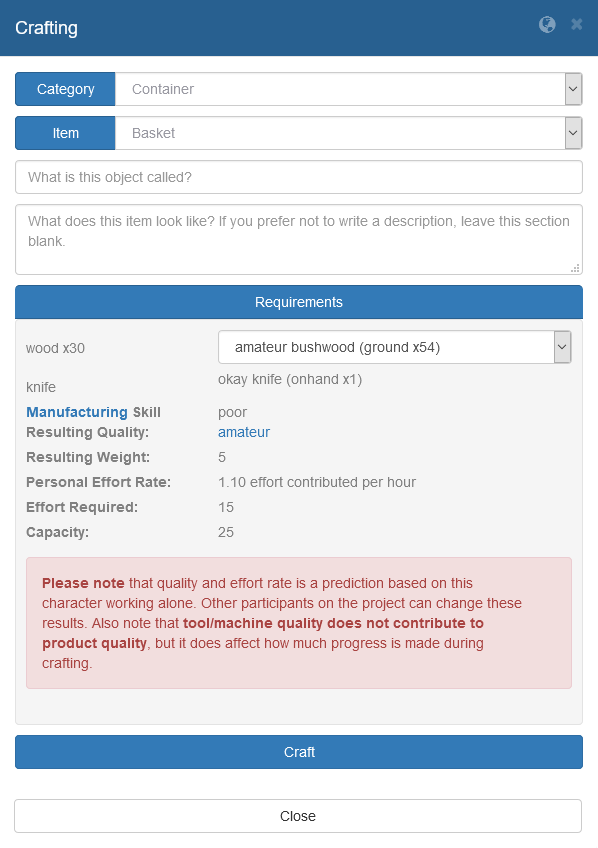
Every item in the game aside from raw resources and those given as gifts from the gods is crafted using this window. In order to craft an item, first select its category, then the specific type of item you want to craft. Note that most items will not show up on the crafting list unless you have at least one of the materials required to make it, even if you do not have enough. For instance, it takes 3 wood to craft a needle, but it will show up in the list as long as you have at least 1 piece of wood available.
For most items you can specify a description, and for some you can also specify the name. While both of these are optional, it can be a good idea to give your items names that help you distinguish them from each other.
Projects
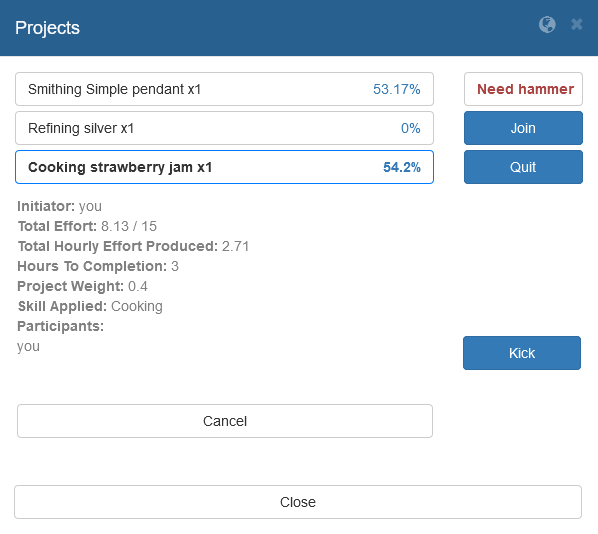
This window shows a list of all projects currently in progress in the area. This includes resource gathering, crafting, as well as lockpicking, stealing, taming, and all other actions that require effort to complete. Once you start a project using the Crafting menu or by any other means, it will show up here. This is also where you can join others' projects, quit working on a project, and cancel projects. Note that you can only cancel a project if it currently has 0 progress, OR if you are the initiator and have worked on it for less than 3 hours, OR if the project has made no progress for the past 2 in-game years. If you are a project's initiator, you can also kick other people off your project, for instance if you want to finish the project on your own.
Groups
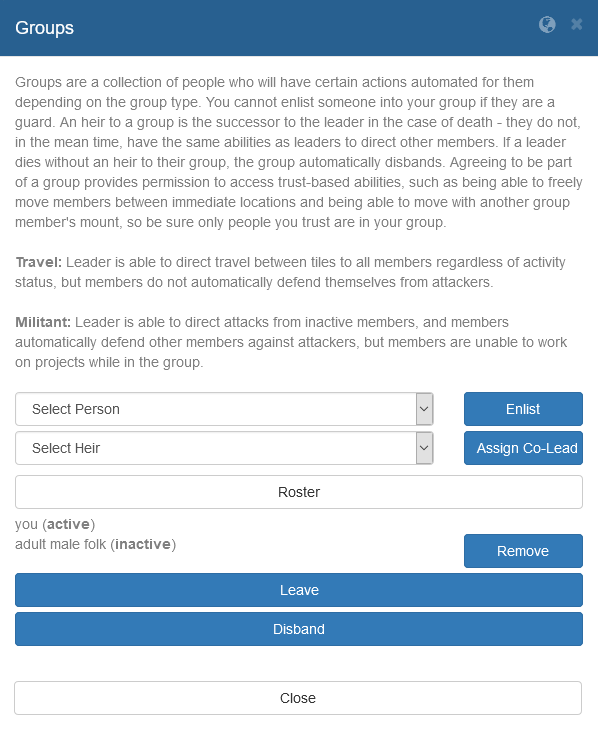
From the group window, you can create and manage groups. Once you have created a group, you can enlist people in the area, assign an heir who becomes the new group leader if you die or leave the group, and see a roster of who is in the group. If you are the group leader, the roster will also display who in your group is currently active, which means that they have been logged in to their character within the last 15 minutes.
Event Log
Arguably the most important section in the game, this is a list of all the things that have happened in the game that your character can see. This includes dialogue, combat messages, as well as notifications about projects and other events. This is also where the posts you write will show up, and is your main way of communicating and interacting with other characters. The main focus of Marosia is the roleplaying, and as such a large portion of your time playing the game will presumably be spent reading and writing posts here.
When writing a post, there are two generally accepted standards for distinguishing actions/emotes from dialogue. These are usually referred to as asterisk style, and novel style.
When using the asterisk style, actions will be surrounded by asterisks (*), whereas all other text is considered to be dialogue. Below is an example of this style:

The novel style is named such because it imitates how novels are written, with dialogue within quotation marks (") and all other text being considered actions. Example:
Whichever style you prefer, additional flair can be added to your posts by using HTML style formatting. The following tags are supported:
- Bold: Writing <b>example</b> or <strong>example</strong> will result in bold text: example
- Italics: Writing <i>example</i> will result in italicised text: example
- Line break: Writing <br> will result in a line break, the same as when pressing enter. For roleplaying posts this tag is generally not necessary, but for character and item descriptions as well as character thoughts this is the only way to separate your text into paragraphs.
Generally speaking, events are colour coded to more easily distinguish them from each other:
- White: Posts written by players, containing dialogue and character actions.
- Yellow: Combat vs animals, messages relating to eavesdropping and other actions of potentially dubious legality.
- Red: Player vs player combat, as well as messages regarding characters outright breaking the law.
- Blue: Travel messages, as well as system messages such as characters spawning or custom admin events.
- Grey: Miscellaneous messages such as those relating to projects, prayers, whispers, and weather changes.
People List
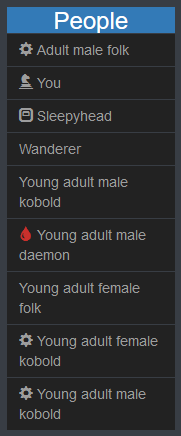
This section shows a list of everyone who is currently in the same location as your character, in descending order based on age, as well as anyone who is either mounted or in a vehicle if you are outside.
In certain cases, characters will have one or more symbols displayed next to their name, each of which denoting their current status:
Other characters will have their name set to "{age} {gender} {race}" by default, but you can set your own nicknames for them by clicking on their name, either in the People List or the Event Log. This will open the Person Information window:
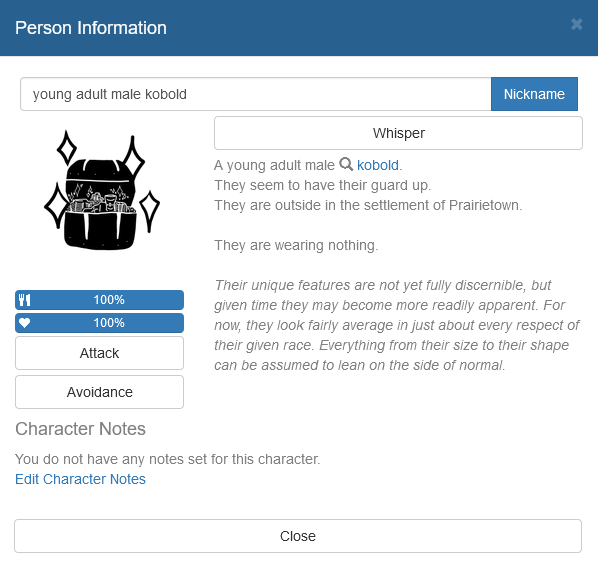
Using this window, you can set a character's nickname, see basic information about them including their portrait, description, and what they are wearing, as well as perform actions such as whispering to them, attacking them, adding character notes, or mating with them if applicable. This is also where you can choose to avoid that character's account.